For many homebrewers, Mr. Beer was their introduction into the world of brewing. It’s also one of the most gifted kits around, but it bears one question that has been swimming in my mind for awhile now:
Can one of these kits actually make decent beer?
Looking for an answer, I went on a furious online search to look for as many Mr. Beer reviews as I could find.
But there was one problem – none of them really “stuck out” to me. I couldn’t find anything comprehensive that covered it from top to bottom, beginning to end.
That’s when I decided to give the elusive Mr. Beer kit another try.
Wait a second…did I just say another try?
My First Mr. Beer Experience
About 16 years ago was when I first heard of Mr. Beer. It looked so simple and I was excited at the potential of having a beer I could make on my own.
Being under legal drinking age (college age, but still under 21 at the time), I was able to purchase the kit myself.
I wanted to get brewing so badly that I made my batch the moment I took the kit home.
Fast-forward a few weeks later. I cracked open my brew that I was so proud of, only to be thrown off by an awful flavor.
It…was…terrible!
Looking back, I now know why – I didn’t read up on homebrewing and didn’t understand the process.
I also didn’t understand how important it was to sanitize everything (and do it thoroughly)!
When I really started to get into homebrewing roughly 2 years ago, I started with extract kits and worked my way up to an all-grain setup.
Mr. Beer and I didn’t get along, and that bad experience made me want to avoid it like the plague.
But after having some experience under my belt (and more knowledge), the idea of trying another brew with a Mr. Beer kit seemed fun.
Not only that, but I wanted to provide beginners with a fully detailed review. No b/s either – I wanted to put it all on the line.
And so the idea to give Mr. Beer another try was born!
My All-In Mr. Beer Review
If you’re thinking about taking the plunge into the world of Mr. Beer, make sure you read this entirely. Don’t do what I did before and jump in head first without understanding some basics (don’t worry – I cover many of these below).
That said, let’s dive right into this thing…
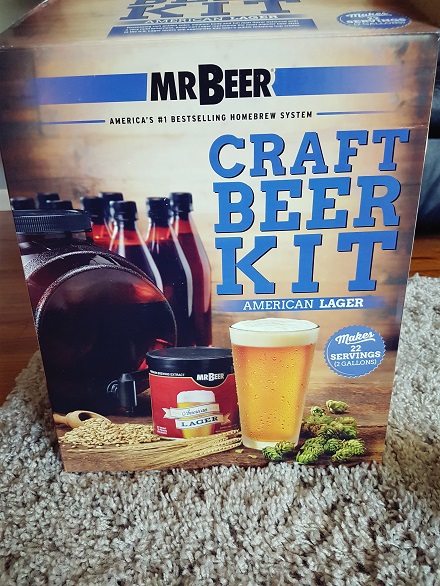
The Specific Kit That I Purchased
Mr. Beer American Lager Craft Beer Making Kit
The Beer That I Brewed
American Lager
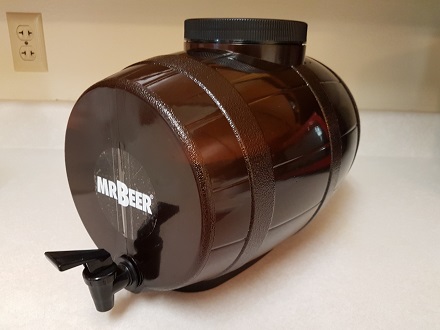
What Came Inside the Box
I have to admit – when this landed on my doorstep, I was pretty stoked to rip it open and take a peek at the entire setup.
The complete kit came packed with everything necessary to brew beer:
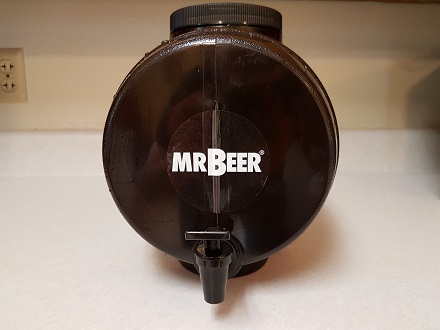
- 2 gallon Barrel Fermenter w/cap
- Spigot w/screw on nut and rubber seal
- American Lager malt extract
- Yeast Packet (under the lid of the can of malt extract)
- No-Rinse Cleaner
- Brewmax Booster Packet
- (11) 22 oz. plastic bottles with caps
- Complete instructions
- Mr. Beer Branded stickers (for bottles and fermenter)
- Carbonation drops*
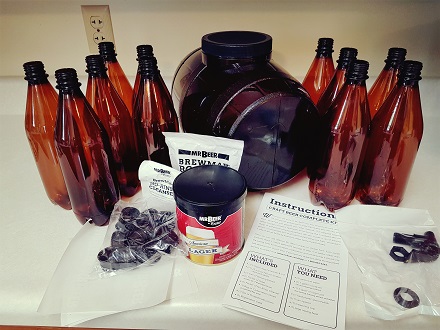
*Note: The carbonation drops are not pictured as they were damaged during shipment. Things happen, so I wasn’t too upset about it. I never contacted Mr. Beer for a replacement and ended up just using table sugar instead to condition the beer (instructions contain chart for table sugar amounts to use in each bottle).
In all honesty, I could’ve used the carbonation drops (the package was ripped open and a few were loose and jostling around in the box). However, I just stuck with the table sugar as it was easy to do. Besides, purchasing carbonation drops when you can use table sugar isn’t very cost-effective in the long run. More on that later.
Brew Day
A couple days after my Mr. Beer kit arrived, I was ready to brew.
After pulling everything out of the box (repackaged after taking photos above), I started to assemble the spigot onto the fermenter.
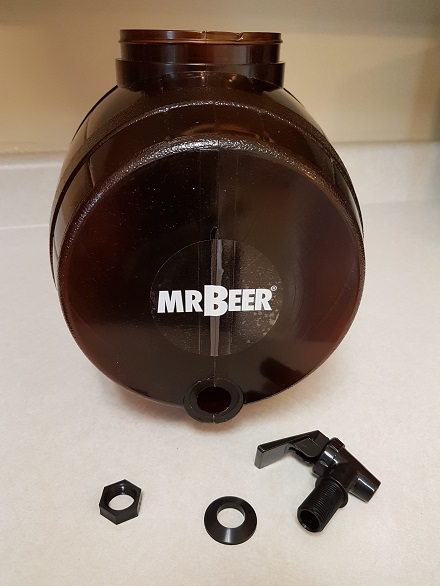
It’s a simple process:
- Rubber seal goes onto threaded side of spigot (flat side facing spigot and beveled edge facing barrel).
- Insert threaded end into front hole on barrel.
- Screw the nut onto the thread until you get a snug fit.
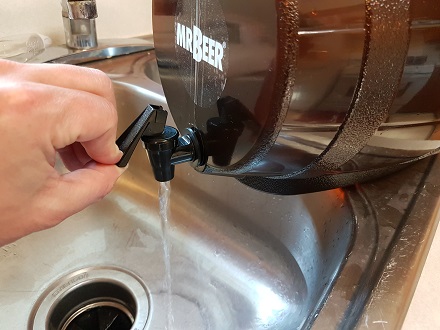
Once that was done, it was time for a quick rinse of the barrel and a leak test to ensure that no leaks were coming from the spigot (or the barrel itself).
In order to proper test for leaks, Mr. Beer recommends filling up the barrel with at least a gallon of water and setting it to the side for 10 to 15 minutes. During this time, you’ll be keeping a watchful eye for any noticeable leaks.
For the best test possible, make sure that you wipe down the outside of the barrel and around the spigot before placing it on a hard surface (e.g. your kitchen counter) for the duration of the test.
Important: Do NOT skip this step! I was glad I didn’t, because I ended up having a leak.
After messing around with the spigot a bit and running a few more tests, I was able to get things situated.
To take things a step further, I held the barrel over the sink at a downward angle (spigot facing down) to put added pressure on the spigot. While doing this, I remained focused on the seal around the spigot to make sure no water was coming through.
At this point, I was confident I was in the clear.
Again, don’t get lazy with this. You don’t want to get through the entire process only to end up with a mess on your hands (not to mention the beer you will lose).
Now it came time for what I feel is the most crucial piece to making good beer: sanitizing!
The kit came with a packet of No-Rinse Cleaner. While I have StarSan on hand, I wanted to follow the instructions and stay as true to the process as I could.
Since my barrel already contained a gallon of water from the leak test, I emptied some water through the spigot to give it a quick internal rinse.
I then added room temp water back into the barrel to get the volume back up to 1 gallon (the suggested amount via the instructions).
Once that it was good, I emptied half a packet of sanitizing solution into the barrel and, using a spoon, mixed everything together until the sanitizer was fully dissolved.
I quickly popped on the lip and gave the barrel a good shake for roughly 30 seconds (over my kitchen sink, since water did escape through small grooves on the threads of the barrel under the lid – more on that in a bit).
The sanitizing solution sat in the barrel for another 2 minutes before I gave it a good 30 seconds of vigorous shaking again, just to make sure everything was covered. Could’ve done with less, but you never want to be too careful.
Another important reminder: Don’t dump the sanitizer just yet! You’ll need to reallocate it to another large bowl to sanitize the rest of your materials!
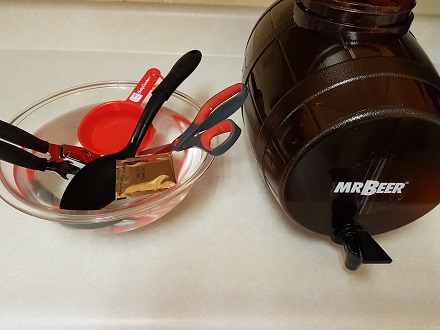
Once the barrel was sanitized, I ran the solution through the spigot into a bowl, which included the following items:
- Measuring cup
- Mixing spoon
- Can opener
- Scissors
- Yeast packet
Similar to the sanitizer in the barrel, I let these items soak for a few minutes. During this time, I grabbed my small stockpot, a small bowl, a gallon of spring water, and my malt extract.
On the stove, my stockpot was ready and waiting for water. I poured 4 cups of spring water and added the Booster packet (just a packet of sugar basically), which helps boost the overall ABV. This isn’t necessary, but it came with the kit and hey, who can argue a little higher ABV percentage?
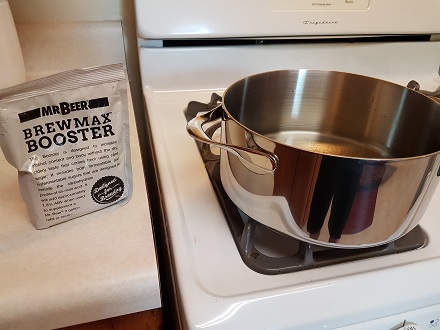
After mixing the Booster in with the water until it dissolved, the stove was turned on to heat the water up to a boil.
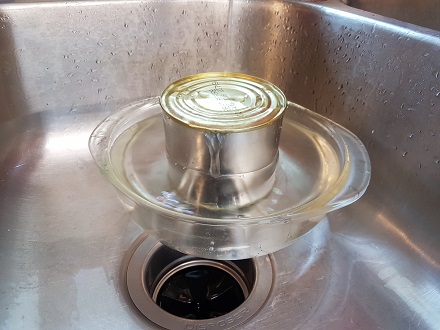
To help loosen up the malt extract and make it easier to pour, I removed the label around the can and had it sit in a bowl of hot water in my kitchen sink.
With the water at a fast boil, I killed the heat on my stove (if using electric, move it away from the heat source), opened the can of malt extract (using the sanitized can opener, of course), poured it in, and gave it a good stir (roughly a minute or so).
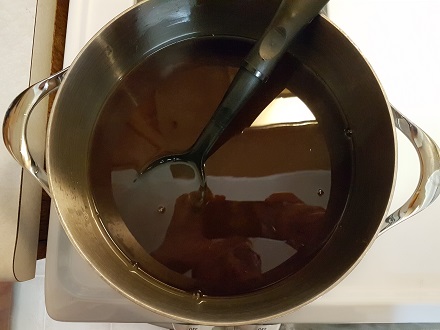
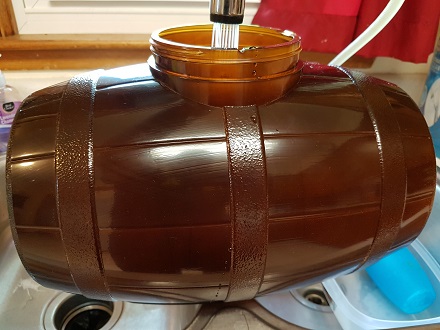
At this point in the process, the wort was ready for the barrel fermenter.
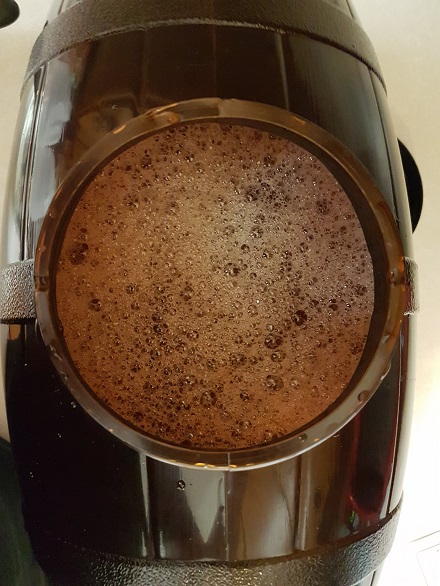
Following the Mr. Beer instructions, I had the sanitized fermenter filled with a gallon of cold spring water. The hot wort was carefully dumped into the barrel with more cold spring water added to bring the volume up to 2 gallons.
To prepare the best environment for the yeast to get active, I took my sanitized mixing spoon and vigorously stirred the wort to aerate it.
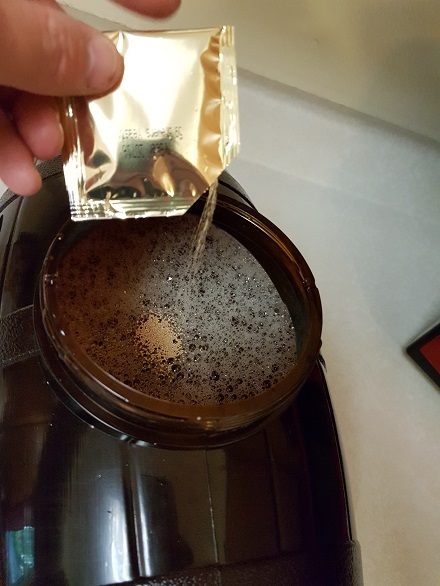
Using the sanitized scissors (are you starting to see a theme here?), I cut open the yeast packet and pitched the yeast directly on top of the wort.
The barrel was then sealed and stored in my basement (which averages around 65°F).
And just like that, brew day was complete!
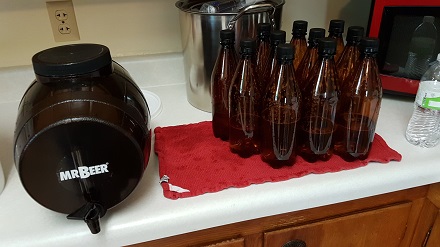
Bottling Day
According to the Mr. Beer Instructions, the recommended fermenting duration is 3 weeks and bottle conditioning for another 3. In my opinion (and previous experience), fermenting for 2 to 3 weeks is suitable and conditioning for 2 to 3 weeks also works.
However, letting it ferment/condition on the longer side of the scale certainly won’t hurt anything.
My beer ended up sitting in the fermenter for 3 weeks (life happens and I got busier than usual).
Guess that meant it was time to finally bottle this stuff up!
I gathered the following:
- (11) 22 oz bottles and caps
- Small plastic bucket
- The last half packet of no-rinse sanitizer
- Small glass
- Measuring spoon
- Plastic funnel
I collected water in the small bucket and poured in the sanitizer crystals, stirring it slowly until it was completely dissolved.
To make sure the spigot didn’t get any contaminants on it during the fermentation process, I took a small glass, filled it with sanitizer solution and held the glass up to the opening of the nozzle for roughly one minute.
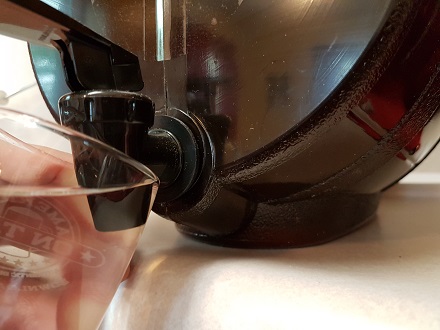
Once that was wrapped up, I dumped my plastic caps, measuring spoon, and plastic funnel into the bucket with sanitizer and carefully filled up each bottle about halfway with the solution. Bottles were capped and shaken quite vigorously for about 30 seconds or so.
Similar to the sanitizing process of the barrel fermenter, I let the solution soak in the bottles for about 2 minutes.
Being the cautious guy I am, I gave each bottle one more good shake before dumping out the sanitizing solution back into the bucket along with all of the caps. Doing this ensured the caps would remain sanitized until the bottle was filled and sealed.
The process of filling up each bottle was pretty straightforward:
- Place bottle opening at the bottom of the spigot, tipping the bottle back towards you at an angle so that the fill doesn’t stir up any oxygen (oxygenation = off flavors in the final product).
- Press down on the spigot to release the beer.
- Let it flow until you have about 2 inches space between the top of the beer and the cap.
- Measure out 2 teaspoons of sugar and dump directly into the bottle (I used a sanitized funnel and spoon for this process as my carbonation drops were tossed out due to damage).
- Grab a cap, twist to seal, and repeat until complete.
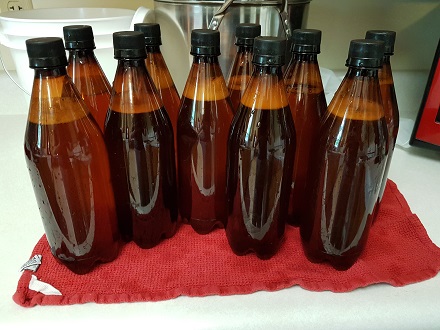
One thing to note: I was only able to fill 10 of the 11 bottles due to trub (the yeast cake that settles to the bottom) taking up more space than I thought. This reduced the overall volume of beer in the fermenter. This was somewhat expected, so I wasn’t surprised. 220 ounces of beer was still a great yield!
I also pulled a small sample of the beer, just to get an idea of the overall profile (the beer will be flat). While it wasn’t the best beer I’ve made, it wasn’t the worst. It was drinkable and tasted similar to other similar beers in its style class.
Tasting Day
The day that every homebrewer waits for finally arrived.
It was time to finish what I started and evaluate this beer. I was eager to see if it was better than the beer that I made 16 years prior with what is essentially the same kit.
Note: Before I dig into this, I should mention that I waited 2 weeks for the beer to condition. It’s at a point where I feel that it’s good enough to fully evaluate. Any less would’ve been too green. Another week or two wouldn’t hurt anything and would only help the beer taste even better (I’ll try to provide an update after they’ve been in the bottle for 3 to 4 weeks and record the difference).
I put one of the bottles in the fridge overnight to try the following day.
Upon opening the beer and pouring it into my mug, I immediately noticed the amount of carbonation. It was stellar! The head wasn’t very large (as shown in the photo below, but I also poured this slowly into the mug).
The rich golden hue is very comparable to beers in this style (i.e. Bud Light for those domestic folks new to homebrewing/craft beer).

However, the one thing that I was impressed with the most was the clarity! The beer was very bright (meaning no yeast in suspension) and just looked great overall!
I shouldn’t be too surprised on this since the beer was made from a malt extract. Even then, I would expect to see some cloudiness due to the yeast, but it looks like it settled nicely to the bottom of the bottle.
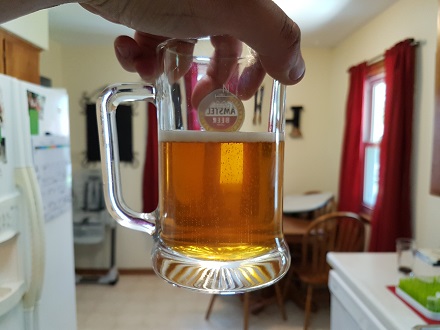
Before giving it my first taste, I gave the mug a quick sniff to see what the aroma was like. I mostly got hints of bread, so I wasn’t sure what the flavor was going to be like.
Upon first taste, I immediately noticed the crispness of the beer itself. The carbonation made it very refreshing. There was also a slight hint of apple, which can be attributed to this style.
It can also mean that the beer is young and that it needs more time to condition.
That said, as I mentioned above, I will be providing an update on the flavor after 3 to 4 weeks in the bottle.
Overall, the apple was fairly faint, which some yeasts can produce during fermentation. It was still a very drinkable beer.
I have to admit, I was quite surprised that I was able to produce something that was worth drinking from a kit that many homebrewers often “look down” upon (which is ironic considering a lot of them started this way).
The Final Verdict
I’m happy to report that this batch of Mr. Beer didn’t turn out anywhere close to the batch I made nearly two decades ago.
I’m glad I gave this kit and process another shot. It made me appreciate the product that initially got me and so many others into the hobby of homebrewing.
To quickly sum up my final thoughts, here is a quick breakdown of what I enjoyed and what I think could’ve been better:
What I Enjoyed
- The process wasn’t time consuming and very condensed. During brew day, I went from pulling everything out of the box to wrapping up the process in a little less than an hour (my current all-grain process is at least 4 hours from start to finish).
- Doesn’t require a lot of equipment or space.
- No need for a big investment. It’s perfect for anyone who isn’t sure if they will enjoy brewing beer and doesn’t want to spend a ton of money to find out.
- Using extract means a more predictable beer.
- Instructions are straightforward (which is perfect for a new homebrewer).
What Could Be Better
- The spigot assembly and plastic barrel could be better made, but at this price point, small hurdles are to be expected. It still serves its purpose.
- I’m not the biggest fan of the plastic bottles, but again, they serve their purpose. Might be worth investing in a bottle capper and glass bottles down the line if you plan to brew more frequently.
- The No-Rinse Sanitizer is average. Unlike Star-San (which sanitizes on contact), the included sanitizer needs remain in contact for a longer duration.
What I Recommend
- Use spring or purified drinking water. Tap water contains a variety of potential contaminants that can throw off the flavor of your beer. Your water profile actually matters quite a bit more than you might thing!
- Make sure to sanitize EVERYTHING, including the yeast packet and scissors to cut it open. This is common practice, but something the instructions do not touch on.
I had a lot of fun reviewing this Mr. Beer kit. In fact, I may even consider picking up a refill kit when I feel like making something quick without having to pull out all of my all-grain equipment.
While I definitely enjoy making my own recipes, it’s nice to do something that is tried and true, yet still gives you that homebrew feel.
Is it going to turn you into a brewing expert? Not even close, but as I mentioned above, it’s a good way to determine whether or not this is something you want to dive deeper into.
Even then, you can tinker with these extract brews to put your own spin on things. It’s homebrewing, remember? ANYTHING is possible!
Thanks for such an honest and in depth write up! I was wondering… You said to possibly consider glass bottles…. Would it be OK to use glass bottles you’ve drank store bought beer from and just clean and sanitize those?
Thanks again!
Absolutely, and I personally do this all the time! As long as they are bottles that had the pry-off caps (no twist-off ones), they will work just fine.
If you’re having trouble removing labels, check out this post: https://www.howtostarthomebrewing.com/how-to-get-labels-off-beer-bottles/. One thing I need to update that post with is that if you’re ever having issues removing glue from the label, Brillo pads work amazingly well!
Good luck, and please feel free to reach out if you have any other questions!